HOME PAGE
WHAT'S NEW?
JUNIOR PAGE
COACHING
WHAT IS
ORIENTEERING?
GALLERY
MAPPED AREAS
EVENTS DIARY
RESULTS
SOLUS
CLUB POLICIES
HOW TO JOIN
LINKS
CONTACT US

THE HEADLESS CHICKEN PAGES
IOF Pictorial Descriptions .
At larger orienteering events (Badge events and upwards) the information about controls is provided in a standard pictorial format - a sort of Esperanto for orienteering. Control description sheets are displayed in the assembly area and the orienteers can view them. Even among experienced orienteers comments along the lines of 'what does that symbol for control 7 mean again' can be heard: so if they are having problems the pictorial descriptions can be particularly daunting to newcomers to such events.
Here is a typical description sheet using pictorial descriptions. At first sight it is rather foreign, especially if you have never seen its like before and you have just rushed up to the start line. Hopefully this article will help to make all clear.
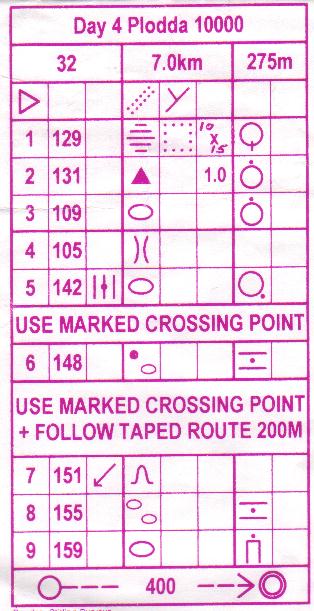
First of all look at the heading: the first line tells you what event the sheet is for. The second gives the course number, direct/optimum route in km and the climb in meters.
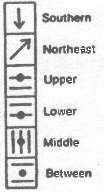
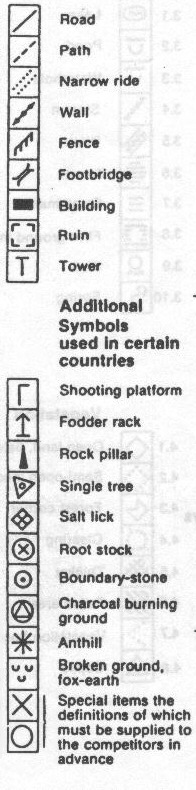
The rest of the sheet is about the control descriptions: you will notice that it is split into 8 columns. The most important information has a thicker line running down the left hand side of the box i.e. column 4 which describes the feature that the control is on and 7 which gives further information about the location of the kite.
Box 1 is simply the sequential control number starting with the start kite.
Box 2 provides the control code which will be displayed at the control site.
Box 3 contains information which clarifies which is the control feature among similar features where they might be confused with each other i.e. if there is a cluster of knolls you need to know that the control is on the most northerly one. For many (most) controls this column is empty - an entry here is a warning to take particular care in your navigation.
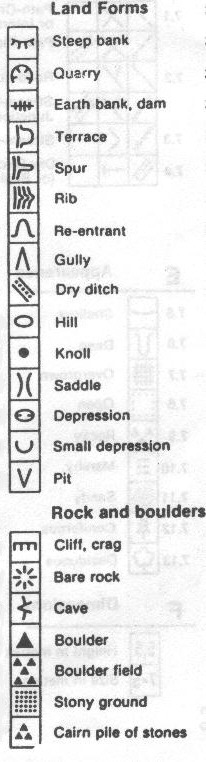
Box 4 is the most important box and the one that causes most problems - it indicates what type of feature the control is on.
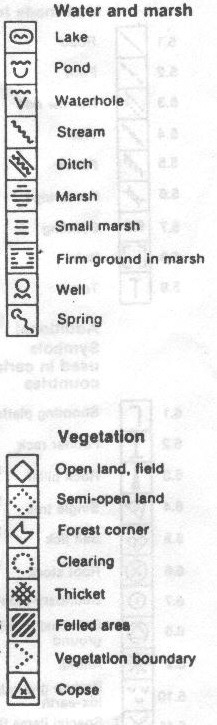
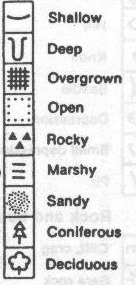
Box 5 gives more detail regarding the appearance of the feature. For instance a re-entrant could be further described as shallow.
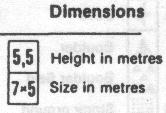
Box 6 gives the dimensions of the control feature e.g. cliff
2 meters.
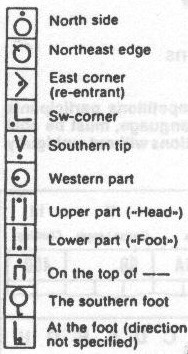
Box 7 location of the marker on the feature.
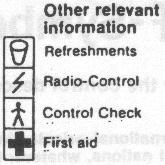
Box 8 provides additional important information e.g. manned control, drinks station.
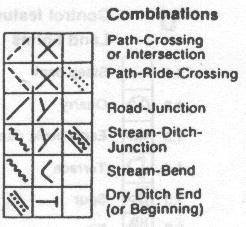
The information here appears in columns 4 to 6 of the control description sheet and the full meaning comes from looking at the entries in the combination of these columns for each control. For an example look at the description for the start kite (Junction of narrow rides).
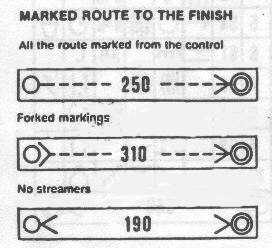
The last section, at the bottom of the sheet, gives information on whether or not the route from the last control to the finish is marked and if it is, how.
Having worked your way through this article you now have all the information you need. Why not have a go at "translating" the description sheet at the beginning of this article. (The "translation" appears below.)
The start kite is located at the junction of two narrow rides.
1) 129 Southern edge of marsh (open) 10x 5m.
2) 131 North side of boulder 1m.
3) 109 North side of hill.
4) 105 Saddle.
5) 142 South east side of middle hill.
6) 148 Between a knoll and a hill.
7) 151 South west re-entrant.
8) 155 Between two hills.
9) 159 Top of hill.