HOME PAGE
WHAT'S NEW?
JUNIOR PAGE
COACHING
WHAT IS
ORIENTEERING?
GALLERY
MAPPED AREAS
EVENTS DIARY
RESULTS
SOLUS
CLUB POLICIES
HOW TO JOIN
LINKS
CONTACT US
THE HEADLESS CHICKEN PAGES
Contours. Part 2. Visualisation.
Visualising the shape of the land is a very useful skill for orienteers. It enables you to predict what you will see on your chosen route. Once you have mastered it you find that navigation is no longer a puzzle that is frequently on the verge of becoming incomprehensible. Rather you become confident that the shape of the land will help you find your way even when line features are few and far between. It can also help you identify much more quickly when you have deviated from your chosen route. So how skilled are you in this area? If you were to pick up an unfamiliar map now would you be able to predict how the land would appear? Armchair orienteering may not sound very exciting but taking the time to sit down and look at orienteering maps away from the race situation can be a very valuable exercise. Without pre race nerves, oxygen debt or the pressure of other orienteers around, you are free to take your time and work out exactly what information is set out on the paper. In the last article on Orienteering techniques the basics about identifying high and low land and steepness of gradient were discussed. This is a starting point but only touches the surface of how contour lines can help the orienteer. To be able to produce consistently good results you need to develop this basic interpretation much further.
Focussing on an individual orienteering technique is good for improving it but at some point you need to start using the techniques together. Here visualisation is combined with "traffic light orienteering" i.e. dividing the leg into 3 parts, green, orange and red. You will recall that the green section accounts for the longest part of the leg. You need to keep navigation simple so as to move swiftly through the terrain. Your visualisation also needs to be simple - look at the general shape of the land. Is there a hill or large knoll? What is your general movement direction in relation to the contours? If contouring, work out if the high land is on your left or right. If you are crossing the contours will you be going up or down hill? Perhaps there is a re-entrant, ridge or a distinctive line of knolls that will keep you heading in the right direction. Avoid looking at small features such as dot knolls, pits or any feature which will be difficult to find; small features and 'green' visualisation are incompatible.
The orange phase is when you are approaching your attack point - this should be a distinctive feature that is reasonably close to the control. Navigation has to be more precise so you may find yourself using smaller features to assist - the detail in your visualisation has to match this so you might be thinking of shapes of hills, larger knolls, re-entrants. Whenever possible avoid getting embroiled in the smallest details at this stage. You enter the red section after your attack point. Now is the time to use smaller features if there are no larger ones to use and again your visualisation should be on the same scale. Visualising small "negative" features e.g. pits and small depressions is rather difficult and should generally be avoided - they are notoriously hard to find. Much better to use features such as knolls (their height and shape), small marshes, clearings, crags and boulders. As long as you are not in the middle of "fight" or thick bracken you will find this type of feature reasonably quickly.
Below are some examples. Look at the map extracts and try to work out what you will see before looking at the written descriptions. Think about the land forms you will see, traffic light orienteering, distance judgement and other orienteering skills that you use.
@ Crown Copyright. All rights reserved. PU 43423U. BOF Map Registration No. 0172SO.
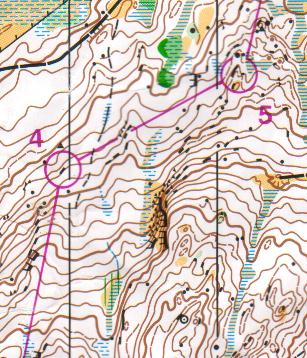
The initial impression is of a mass of brown lines and no line features, but don't panic. First of all work out where the highest land is - in this case it is to the south of the leg. Next look at the shape of the contours which the direct line crosses. You can see there are two spurs. These will help you keep track of where you are in the terrain. You could try contouring but in my experience this is very difficult. In theory there should be advantages but in practice it is all too easy to lose height without realising. So I would advise taking a bearing. Take note of the distances between features. After 130m you should have found your first spur. After another 200m you will have found the second spur, which has a large crag on it. You are now in the red phase of the leg. The spur is your attack point. With luck you will be within sight of the crag, skirt round below it until you reach the other side of the spur and you are in the shallow re-entrant. The flag should be visible now.
@ Crown Copyright. All rights reserved. PU 43423U. BOF Map Registration No. SO-01-368
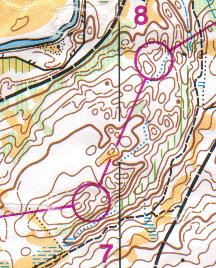
Again take a moment to identify high and low land. In this case not too difficult - no 7 is on a re-entrant which is on the side of a small hill. Leave the control heading in a north easterly direction and skirt around the end of the small hill. On your left there should be a knoll. Pass between these two features and then drop down to follow the long spur which heads towards the next control for a distance of about 200m. (However beware: if you fail to identify the knoll on the left you run the risk of following the shorter spur to the south. ) You will notice that re-entrants run along both sides of the spur that you are to follow so the land form is well defined, and provided you pay attention, you should not stray. You are now in the orange phase of the leg. When you reach the end of the spur you are about 100m from the control. To reduce the possibility of error follow a bearing in the direction of the control site. En route you will expect to cross a linear marsh just before skirting around the side of a large knoll. You are now in the red phase of the leg. A smaller knoll should be in sight now and the control flag should be visible.

@ Crown Copyright. All rights reserved. PU 43423U. BOF Map Registration No. SO-01-360
The forest around 14 is relatively featureless and it is all too easy to head off in the wrong direction so take a rough bearing. Follow this bearing for 110m. On reaching the forest road you will be climbing up hill. By aiming to pass between the two knolls at the top of this rise you will be able to predict with confidence where you should begin your descent. Cross the road. You are now entering the orange phase. To your left there should be a spur, ahead of you the ground slopes steeply down. Head straight down for about 100m until you find the clearing. This is now the red section of the leg. You should now find the thicket with little difficulty.
How did your description of route choice compare with those given above? I am sure that there would be differences. Alternative route choices are inevitable in orienteering but what matters is your ability to visualise what you will see and in knowing your own strengths and weaknesses both physically and in navigation skills. As with all things the more you practise the better you will get so why don't you take the time to look at some of your own maps - preferably use areas that you are less familiar with? You don't have to confine this activity to indoors. You could also take an orienteering map out with you next time you go for a training run. (The map doesn't have to be of the area you are running in.) This will give you the opportunity to practice reading the map while moving. Another good time to practise is at the club's Saturday morning events. This way you get confirmation of whether you are successfully interpreting the map but you do need to be able to resist the temptation to race your rivals for the best result!