HOME PAGE
WHAT'S NEW?
JUNIOR PAGE
COACHING
WHAT IS
ORIENTEERING?
GALLERY
MAPPED AREAS
EVENTS DIARY
RESULTS
SOLUS
CLUB POLICIES
HOW TO JOIN
LINKS
CONTACT US
THE HEADLESS CHICKEN PAGES
Attack points
In recent years articles on technique in Solus have addressed the topics of traffic light orienteering and distance judgement. These are the basic tools for orienteers and allow other techniques to be used. One strategy to simplifying navigation is the use of attack points - the topic of this article.
Attack points are distinctive features which are reasonably easily found and are close to the control. The idea is to get as quickly as possible to the attack point using rough navigation skills - this leaves a shorter distance in which precise navigation is required. This should ensure that the time taken is kept to a minimum .
So how do attack points work in practice? On starting a leg you need to look at the area around the control site and select a feature that you are confident you can find quickly and easily. This should be as close as possible to the control. You then make haste to the attack point and from there navigate to the control. Your choice may be a balance between ease of finding the attack point and distance from the control site - there is little point in selecting an attack point that is difficult to find. This ties in well with traffic light orienteering and from the previous article you will recall how each leg is divided up into three sections i.e.
Green : the longest part of the leg where the aim is to cover as much ground as quickly as possible - without getting lost!
Orange : the control is much closer now and accurate navigation is more important.
Red: you are almost at the control and accurate navigation is critical if the kite is to be found quickly.
The attack point should be identified in the orange / red part of the leg once most of the distance has been covered. Ideally this point should be at the transition between the 'colours'. As an attack point which is a long way from the control in complicated terrain (e.g. dunes) provides little advantage you may need to use a series of attack points.Below are two examples to help illustrate how attack points are used.

@ Crown Copyright. All rights reserved.
PU 43423U. BOF Map Registration No. NE-00-1704 to 5 (Green) Find the narrow ride to the north of no 4 and follow this east until you reach the eastern end of the thicker block of trees which is runnable in one direction. Cut diagonally across the runnable block of forest next to it aiming for the narrow ride at the far side.
(Orange) The combination of the end of the narrow ride and the thick vegetation (which is marked as having a distinct and easily identified edge) should make this easy to find. This is your attack point. Follow the edge of the vegetation change round for 50 meters.
(Red) The control should be easy to find from here if you look at the contour lines and identify the re-entrant on the ground.
7 to 8 This leg appears to be more daunting as there are no line features to use. This can be overcome by using the contour lines.
(Green) Take a bearing from 7 to 8 and follow this up and onto the end of the spur.
(Orange) This is your attack point. Take a brief look from here and you should be able to see the linear marsh ahead of you. To your right and ahead there is another smaller spur. They all help to confirm you are in the right place. Drop down and over the marsh.
(Red) As you get abreast of the smaller spur slow down and look for the re-entrant and the kite.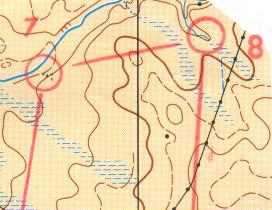
@ Crown Copyright. All rights reserved.
PU 43423U. BOF Map Registration No. 0188SOPoints to bear in mind when choosing attack points:
1) Choose a feature which is easily found: this includes features such as track or path junctions, distinct path bends, streams crossing tracks, large isolated boulders, buildings. Pits, small depressions or features in dense undergrowth are bad news. Vegetation changes on old maps might not be too wise either.
2) Try to pick a feature that is distinctive. One particular large crag on a hillside of large crags is hard to find, as is a ditch junction among a set of ditches. One cairn on a hill top on the other hand can be very suitable.
3) Be wary of parallel features that are similar and could be confused. It can be very easy to focus on one little bit of the map and miss the bigger picture.
4) Remember that less obvious contour lines can at times provide the best attack points of all, particularly when navigating on open moorland.